Pages - Menu

Friday, 22 November 2019

Microstructural Control and Post-Build Processing

Additive material properties have the potential to match or be enhanced beyond conventional wrought and cast properties as the structural control of AM evolves. The AM process has been shown to break up reinforcing carbide or oxide agglomerates, which should enhance material properties. On the other hand, AM process build and post-processing parameters need to be closely controlled to eliminate defects such as porosity (gas or process-induced), particle contamination or from previous material runs (e.g., Nb particles in Ti6Al4V), unmelted feedstock particle inclusions, lack of fusion defects, cracks, porosity, high surface roughness, residual stress, warping and undesirable texture.

Proper post-build thermal processing, such as hot isostatic pressing (HIP) and heat treatments, are often required to consistently attain equivalent or superior properties compared to the MMPDS database of statistically-based design values. Castings and jet engine blades are frequently HIP processed to close internal pores and provide fully-dense parts with improved fatigue, creep and toughness properties.

Pressure Technology, Inc. provides HIP services for densifying 3D-printed metal parts. HIP increases fatigue strength of AM parts (see figure 10). On certain alloys, the microstructure in castings or powder metal parts can be refined through aging heat treatments to improve material properties. Surface finish refinement and surface enhancement (shot or laser peening) could be applied after HIP to further enhance fatigue properties.

AM has the potential to create alloys with unique microstructures for structural applications requiring high-performance materials. Recent development in metal AM has resulted in reduced porosity and unique microstructures with enhancing material properties. Future metal additive part integrity will be enhanced through additional work on the development of improved machine reliability, NDE methods for quality assurance, process quality control and process control of feedstock raw materials.

Wednesday, 16 October 2019

Porosity and Microstructure


Wrought materials (rolled, extruded or forged alloys) are 100 percent dense and the mechanical deformation and recrystallization in these “wrought” processes refine the microstructure or grain structure. A good microstructure in an alloy provides more boundaries to stop dislocations and cracks when the metal is bent or stressed. Castings, powdered metal parts and certain additive manufactured-components are not typically 100 percent dense. For example, printed stainless steels are usually highly porous on a microscopic scale, which makes them weak and prone to fracture. Pores in a material provide initiation points for crack formation.

Yinmin “Morris” Wang, a materials scientist at Lawrence Livermore National Laboratory (LLNL) in California, said, “The performance has been awful.” The static tensile properties of cast, PM or additive parts are usually equivalent to wrought metal parts, but fatigue and creep properties are sensitive to porosity levels and cleanliness or inclusions.
International Materials Reviews, fabricated additive manufactured-metal parts (especially powder bed processes) typically have columnar, oriented microstructures. Equiaxed growth in EBM additive processes can occur at low temperature gradients with high liquid-solid interface velocities. However, in-situ aging and extensive grain growth can occur in EBM processes as the part cools. Equiaxed or acicular structures tend to have better fatigue characteristics, at least in titanium alloys.

Additive manufactured-properties vary with orientation because directional solidification, residual stress, grain orientation and cracks vary with direction. Every metallurgical process can produce a fiber texture or preferred orientation of the crystal grains within a microstructure. Properties tend to vary with crystallographic direction due to directional solidification, so particular properties could be enhanced or reduced depending on the specific texture. Fatigue crack growth in single-crystal nickel-based alloys is very sensitive to the orientation of the crystals relative to the loading axis, so developing the ability to control microstructure and grain orientation is important for critical aerospace components.


In “AM Research and Development at the NASA Glenn Research Center” report, Materials Research Engineer Robert Carter found mechanical properties of EBM Ti6Al4V titanium equivalent or superior to MMPDS handbook data values. He also noted that processing parameters can alter texture and impact properties. Lot 1 and lot 2 (different “builds”) showed different mechanical strengths correlated with fiber texture variation observed by X-ray diffraction pole figures (figure 9). Figure 10 below shows the fatigue strength variations for AM samples taken from the X, Y and Z directions. Z is perpendicular to the deposit surface, X is in-line with the traversing beam and Y is in-plane and perpendicular to Y. Properties change with direction due to the directional solidification occurring during AM.

Wednesday, 4 September 2019

Surface Finish

AM surfaces tend to be rougher compared to conventional processes. Rougher surface finishes reduce fatigue strength compared to polished samples. Additive parts can be machined, ground, honed or polished to enhance the surface roughness, measured as Ra, or other surface finish attributes. Isotropic superfinishing processes might allow surface finish improvements without alterations to the geometry of the additive manufactured-parts. Extrusion honing or abrasive flow machining could be used to refine the surfaces of internal channels or hollows.


In the NASA technical report “Additive Manufacturing Overview: Propulsion Applications, Design for and Lessons Learned” by Kristin Morgan, engineering project manager from the NASA Marshall Space Flight Center, the fatigue performance of selective laser melted 718 nickel-based alloy (UNS N07718) was determined after various post-build surface finish enhancement treatments. Low-stress ground samples were the closest to approach the properties of the MMPDS design values for NO7718.

Wednesday, 7 August 2019

Heat Build-Up and Oxidation

As successive layers are deposited, heat can build-up within an additive part that could lead to grain or microstructure coarsening. The EBM process can take 5 to 80 hours to cool below 100° C after layer melting is completed, depending on part size and geometry, so an additive manufactured-part may experience a significant amount of annealing and recrystallization within the AM process chamber.

Heating certain metal powders or parts in an air atmosphere can result in oxidation or oxide scale formation, so the melting processes (LM, EBD, DED) use inert or vacuum atmospheres. If the atmosphere is not controlled within the metal deposition chamber, then oxidation and contamination of the deposited metal can occur, which can embrittle alloys like titanium. Oxidation can also result in brittle oxide inclusions, which introduces a surface where cracks can initiate. Aircraft grade alloys are often vacuumed arc remelted (VAR) to produce a cleaner, more uniform alloy product with the superior properties required for critical service applications. Current AM equipment from some suppliers makes the fabrication of parts from oxidation-prone materials difficult. In many systems, the metal powder is frequently loaded in open air. 

Monday, 15 July 2019

Residual Stress and Cracking

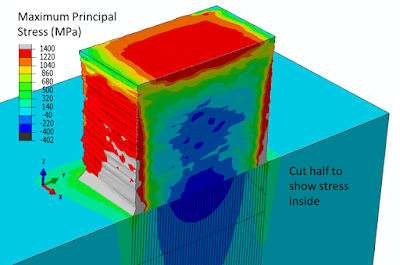
Residual stress and cracking are major problems in 3D-printed metal part manufacturing. Casting, welding, cold forming and machining processes induce residual stresses sometimes resulting in cracked components. Residual tensile stresses can cause warping or distortions and decrease fatigue strength. Stress relief heat treatments can be applied to parts to remove the residual stress, but part distortion and cracking can occur during this process. Mechanical peening, laser peening and ultrasonic peening can impart residual compressive surface stress in a part, which enhances fatigue properties.

High residual tensile stresses can cause cracks in components. Segregation, liquation and shrinkage can occur during AM with melting and solidification steps. Liquation occurs because the lower melting constituents in an alloy solidify first, separating out during solidification. Upon reheating, these liquated regions can cause liquation cracks, usually in the partially melted zone (PMZ) outside the weld pool.

Shrinkage from the liquid to solid volume change can cause solidification cracks, usually in the center of a weld or casting. Liquation and solidification cracking are more likely to occur in weld- or plasma arc-based additive processes where a hotter and larger melt pool heating forms.

Thursday, 6 June 2019

Metallurgical Integrity in Metal Additive Manufacturing

Every materials processing or fabrication method has an impact on the material structure and therefore the properties of the processed material.

Additive manufacturing (AM) metallurgy has its own unique set of processing-structure-property relationships, although many aspects involve powder and welding metallurgy. Processing can impact material microstructure (size, shape and orientation of grains or crystals), which will alter the mechanical properties of the metal alloy. The material properties and structure also alter how a material can be processed.

For example, certain alloying additions can make an alloy too brittle for rolling, forging or other wrought processing. Casting, powder metal and additive processes might be the only way to produce certain highly alloyed materials. The chemistry or composition of the alloy can also change. For instance, titanium alloys will pick up oxygen, which will strengthen titanium up to a point. But if oxygen levels become too high, the titanium alloy will be brittle and crack. Powdered metals are also susceptible to contamination by oxygen and nitrogen, depending on the metal alloy. NASA researchers found increased nitrogen levels in nickel superalloys resulted in increased grain sizes in AM parts.
Powder bed electron beam melting (EBM) processes tend to generate lower residual stress levels and less cracking compared to processes using laser melting (LM) powder bed and direct energy deposition (DED) powder or wire feeding, most likely due to slow cooling and in situ aging. DED powder or wire fed AM processes can be used to deposit multi-materials, which could enable parts with tougher cores and wear-resistant surface layers. Wear, mold, die or tooling surfaces can be rebuilt or repaired with DED processes. Most of the processes that employ melting rapidly solidify the metal deposits, which reduces elemental segregation and can aid in developing refined or unique microstructures. However, rapid cooling can cause gas entrapment, delamination, retain undesirable metastable phases and increase residual stress levels. Binder jet deposits are not prone to delamination, but the as-built “green” parts can be delicate and have high porosities until sintered or fired.